24. Pompeii. Villa dei Misteri or Villa of Mysteries
Room plan
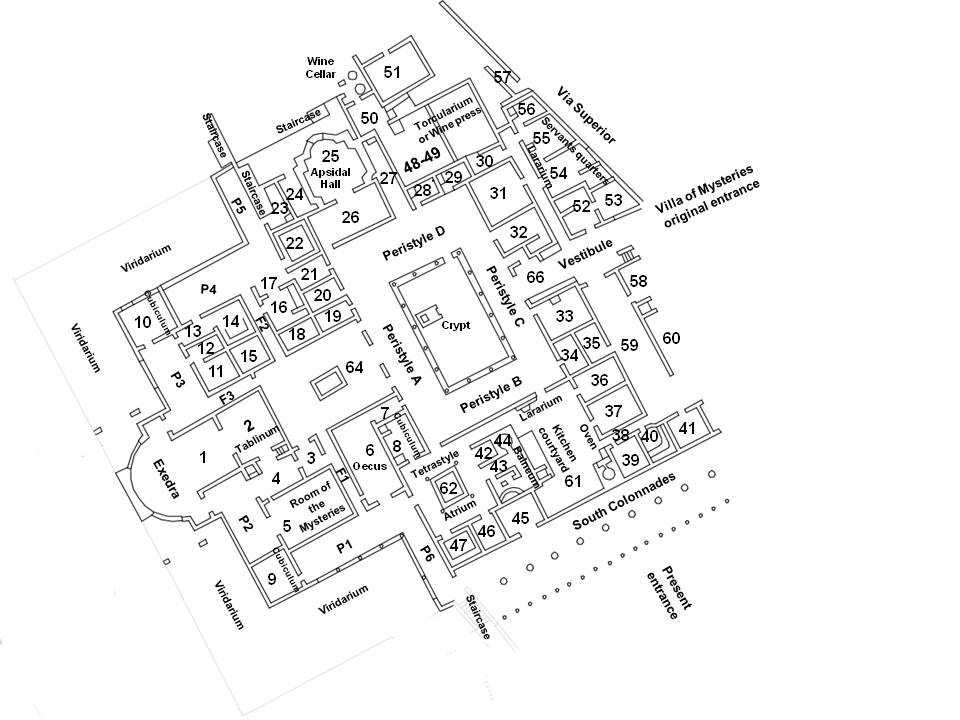
Pompeiiinpictures plan of the Villa of Mysteries or Villa dei Misteri.
Each room is on a specific page on our site with information and photographs.
If your screen is large enough (more than 960px wide) press the room you want on the plan to see the pictures.
If you are on a smaller screen such as a phone or tablet you can use the links below to see the pictures.
The plan and interpretation of the rooms is based on
Pompeii by Amedeo Maiuri, 15th Ed., Istituto Poligrafico dell Stato, Roma, 1978, p. 97-101 and fig. 17.
The Villa of Mysteries in Pompeii, Edizione Spano, 2008.
La Villa dei Misteri by Amedeo Maiuri, Roma, 1931.
Quick Outline
Quickie See an appreciation of the main rooms and areas of the beautiful Villa of
Mysteries, without the need to navigate the many detailed pages of
photographs.
Detailed photos
Key and links
1 = Exedra
2 = Tablinum
3 = Cubiculum with one alcove
4 = Cubiculum with two alcoves
5 = Hall of the Mysteries with paintings of Dionysian mystery
6 = Oecus with second style paintings
7 = Passage between room 6 and peristyle
8 = Cubiculum with double alcove
9 = Daytime cubiculum
10 = Daytime cubiculum
11 = Large cubiculum
12 = Passage to cubiculum 11
13 = Large cubiculum
14 = Large cubiculum
15 = Room with second style painting
16 = Cubiculum with double alcove and procoeton (antechamber)
17 = Cubiculum with double alcove and procoeton (antechamber)
18 = Apotheca (storeroom)
19 = Cubiculum
20 = Cubiculum
21 = Cubiculum
22 = Diaeta (rest room)
23 = Recess under staircase
24 = Apotheca (storeroom)
25 = Apsidal hall which may have been a sacellum
26 = Anteroom to apsidal hall
27 = Passage and former side door
28 = Rustic cubiculum
29 = Rustic cubiculum
30 = Rustic cubiculum
31 = Rustic room
32 = Room with farming tools and kitchen
33 = Rustic room and kitchen
34 = Small rustic room
35 = Room containing cast of body
36 = Room opening onto kitchen courtyard
37 = Room opening onto kitchen courtyard
38 = Passage from kitchen to rustic quarters
39 = Rustic room
40 = Latrine
41 = Rustic room
42 = Apodyterium or changing room
43 = Tepidarium
44 = Laconicum
45 = Rustic room
46 = Room with mosaic pavement
47 = Room with mosaic pavement
48-49 = Torcularium and wine pressing room
50 = Access to wine cellar
51 = Rustic room
52 = Servants quarter
53 = Servants quarter
54 = Servants quarter
55 = Servants quarter
56 = Servants quarter
57 = Side entrance through torcularium and wine cellar
58 = Rustic room (unexcavated)
59 = Rustic quarter access area
60 = Rustic room (unexcavated)
61 = Kitchen courtyard
62 = Tetrastyle atrium
64 = Atrium
66 = Original entrance and vestibule
A = Peristyle A
B = Peristyle B
C = Peristyle C
D = Peristyle D
F1 = Corridor
F2 = Corridor
F3 = Corridor
P1 = Portico
P2 = Portico
P3 = Portico
P4 = Portico
P5 = Portico
P6 = Portico
Crypt = Crypt
Lararium and altar = Lararium and altar
Oven = Oven
North side = North side
South side = South side and Colonnades
Viridarium NW = Viridarium in north-west corner
Viridarium SW = Viridarium in south-west corner
Wine cellar = Wine cellar
The room numbers and descriptions are those referred to on the pompeiiinpictures pages for Villa dei Misteri.
This plan is to help you accurately locate the rooms shown in the photographs of this villa.
Please be aware that the room numbers shown may differ from any other plans or records both published and unpublished.